

I told you in earlier articles that I’d added an Amazon Echo smart speaker to my office. With my purchase of the Echo, I took advantage of an offer to add a smart plug to my purchase for just $5.
Today I finally got around to setting up my TP-link smart WiFi plug.

Step 1 is just to plug it into an outlet or power strip.


Next, I had to download the app that works with this particular smart plug. The process would be similar for any smart plug. In this case, the app is called Kasa for Mobile. It’s available for Android and iPhones. Any smart plug that you purchase will tell you on the box or in the instructions which app you need to download to use it. Before you start, make sure your phone is connected to your home WiFi.

Once installed it will ask you to create an account with an email and password. You’ll then receive a confirmation email. Click the confirmation button in the email and you can begin to set up your smart plug. This isn’t a complicated process, but you do have to hit an awful lot of permission buttons.
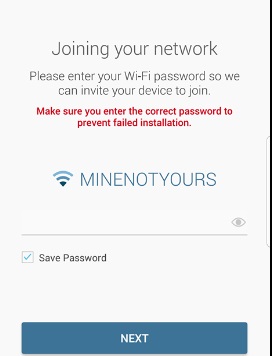
If you want to be able to set up this smart plug to automatically turn on and off at sunrise and sunset ( a great feature if you’re plugging in a lamp), you’ll have to allow it to access your location.

Now it’s time to add my smart plug to the app. I tap the + sign at the top of the screen.

Then pick which device you’d like to add to the app.

The light on your plug should start blinking green and amber.

Now you can give your plug a name. Like ‘office’ or ‘living room lamp.’

Pick an icon for your smart plug. You can also choose to take a photo of the actual thing you’re controlling with this plug.
![]()
Now enter the password for your home WiFi network.
Your plug will then be added to the app.

Since my goal is to control this plug with my smart speaker, I now need to open the Alexa app on my phone or my PC.
![]()
Tap the 3-line menu icon at the top-left.

Then tap Skills from the drop-down menu.

Then search for the tp-link Kasa skill. If you were using another device, you’d search for it by name. Tap on the result.

Now tap that menu icon again and choose Smart Home.

Then choose Add Device.

Tap the name of your device and you’re all set.

Now you can control the device by simply saying “Alexa turn on ‘office 1′” or ‘lamp’ or whatever you decide to name it. Since I wanted to turn on more than one lamp, I plugged in an extension cord and plugged three different lamps into it.
The set-up was super-easy. It just involved tapping a lot of buttons. The entire set-up time took around five minutes. It works perfectly with my Echo smart speaker.
It’s an especially handy way to control a lamp that’s difficult to get to or you have problems getting around. I’ll get into how you can set up schedules to turn the plugs off and on in later articles. If you’d like to check out the tp-link, Amazon has them on special for $19.99 as of this writing. Click here to check it out.
I marvel at how easy you make these processes seem. I get half way through such processes and then . . . .
I left out the part when I unplugged the Echo and then couldn’t figure out why it didn’t respond. Honestly, it was much quicker than it looked. Basically, just a whole lot of tapping. I’m already spoiled. My lamps were at the back of the room, so if it was already dark and I didn’t have the overhead light on (which I usually do not), I had to walk out of the room in the dark or go turn on the other light and come back and turn off the lamps. It was great just to walk in and say “lights on” this morning.