

I’ve had a few questions about how I make the graphics that illustrate our Tech Tips articles. Since I have to make so many of them, I use the simplest way possible. My main tool is the built-in Microsoft Paint program and the PrtScn key on the keyboard.
First, I find the image I want to capture. Here I’m going to grab a screenshot of File Explorer by pressing the PrtScen key – normally located to the upper right of a keyboard. Next, I’ll open Microsoft Paint, click on the screen, and pretty Ctrl + V to paste the image. Or you could right-click and choose Paste from the drop-down menu.

Next, I need to focus in on the relevant part of this image. If I used the whole screenshot it would be difficult to see the information. For this task, I’ll use the Select tool at the top left. The default shape of the tool is a rectangle, but you can choose other options from the drop-down menu.

Click in the top corner of the image. Then drag over the area you want to use in your image. Release the mouse button when you’ve covered it all.

Click the Crop tool at the top.
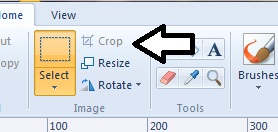
If you need to change the size of your image, click on Resize.

You can resize by percentage or by pixels. Make sure Maintain aspect ratio is checked if you want to keep the image in proportion as you reside.

I like to use arrows to draw attention to the part of the image I want you to pay attention to. Paint offers basic shapes like arrows and thought bubbles. Click the Shapes menu to select.

Adding the arrow is much like using the Select tool. Click on the image where you want to draw the arrow. Hold the mouse button down and draw it until you get the desired size. Then release. If you like the size and shape, click somewhere else on the image.
![]()
Then you can just save the image.
Great tip, but…”pretty Ctrl V”? Translation please, not on my ‘keyboard’.
I left out the + sign originally. Just the Ctrl + the V keys. Or you could right click and choose Paste.
Thks, for the feedback…