

All this week, we’ve been learning about how to use Google Photos in a browser. So far, we’ve covered how to get started and had a basic tour of the free online app.
Today, we’ll learn about options for organizing, sharing, and tagging your photos. Well start by selecting an image. Click to open.

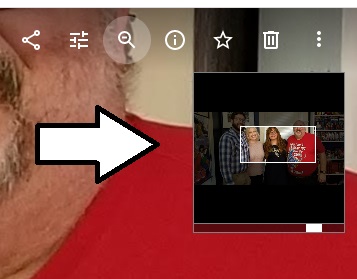
At the upper-right of the open image, you’ll see a menu of controls.

Here’s a closer look.

Let’s start by clicking the Share icon.
![]()
You can share with other people who have Google Photos by putting in their name, phone number, or email address. You can also select from your Google Contacts. Or you can create a link that you can send in a message or email. You can also share via Facebook or Twitter.

Your next option is Edit, but I’m actually going to save that for a separate article.

Next to that, you can click the magnifying glass icon to zoom in on the image.

Use your mouse scroll wheel or the scroll bar control to move in and out.
Click the Info icon to view what type of information, is stored about the image. If you uploaded from a phone, you probably have location and other data. Google Photos automatically uses facial recognition to categorize your images by who’s in them.

This is also where you can add a description.

Edit details like time, date, and location by clicking on the edit icon.

Alter as needed and click on Save.

Click the star icon to Favorite a photo. Click the trashcan icon to Delete.

Click the three-dot menu icon for more options.

From here, you have the option to create a slideshow, download an image, rotate and image, or add it to an album. You can also order prints if you like or archive the photo.

Tomorrow, we’ll check out your options for editing images.